Saturday 28 May 2016

Beach Huts and Pink Houses

These are the latest little makes using the Tim Holtz / Sizzix Brownstone and Village Dwelling dies from the Village collection.


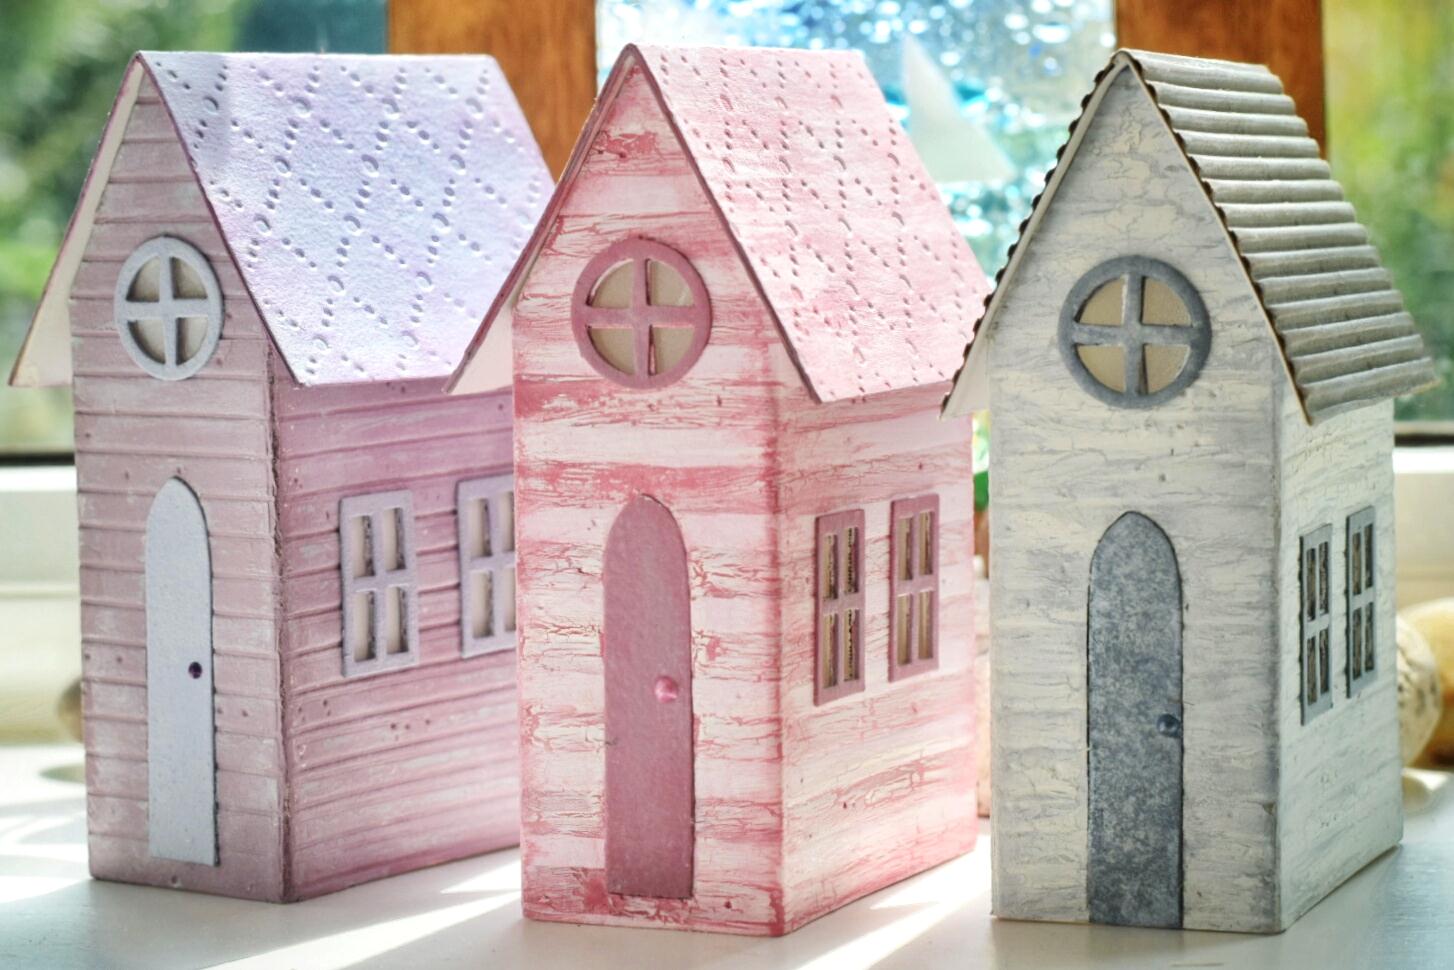
As you can see I've been going all-out with the pink theme this week.


Beach huts are some of my favourite things so these Brownstone dies are just perfect for making little huts. I happened upon a crackle technique quite by accident and thought they looked really cool, so I've stuck with it. 

I think these will be my favourite things to make for a while yet, so I apologise now if I get a bit boring!

Brownstone / Dwelling Combination


This one was a bit of a headache, so might be a one-off. Joining parts of both dies together wasn't too hard to figure out, but for some reason I just couldn't get the colour scheme right.


I ended up with pink and white which I'm happy with.


I love the shuttered windows that come with the Village Cottage dies. I've yet to try out the picket fence or dorma window add-ons.


And of course it wouldn't be complete without my trademark tealight holder. :)

And finally...


I re-painted one of my first efforts. It features in my header photo (the dark pink one with brown windows) but I hadn't liked it much since I finished it. But a quick paint-job later...


...I am so much happier with it. 


Thank you for visiting my blog. Please check out some of my other pages and you can find me on Twitter and Instagram too (@svalleycrafts)

Alli xx


Saturday 21 May 2016

Two more Village Brownstone Houses

Here are the latest additions to my newest collection of houses made from the Tim Holtz Village Brownstone dies. I love making these, they're quicker than the Dwellings and I just love the quirky style.


Houses, chapels, beach huts...


...sheds, they could be so many things.


Thanks for visiting! Please take a look at my other pages.

Alli xx 


Friday 20 May 2016

Greenhouse - Variation on a Tim Holtz Village Dwelling

I'm very excited to share this with you at last. I've had to keep it under wraps for a couple of weeks because I made it for my Sister's Birthday (Happy Birthday Deb! xxx).  I had been wondering for a while if I could adapt the Tim Holtz Village Dwelling die to make a greenhouse and this is what I came up with...


I cut out the standard Dwelling walls, then cut out sections with a scalpel to make the panes and squared-off the door and removed the front porch section.  I painted it in a pale lilac colour, added a hinge to the back and used frosted acetate for the glass.


On the inside I created a bench using some thin strips of wood and made some terracotta pots from air-drying clay.


The watering can was made from cardboard and PVA glue and painted with "Brushed Pewter" Distress Spray. This is one of my favourite Distress Inks, its such a clever product.  The metallic effect is amazing for a water-based stain/paint. The nozzle is made from a small brass eyelet.


I painted the base to look like gravel and added feint brickwork-effect stepping stones with a paintbrush.  I purposely left this quite pale as I didn't want it to overpower the pots and the greenhouse.


I made two matching Bottle-Brush trees to frame the greenhouse and dyed them green.  I will add a blog on how I make these soon.  Using the same method I made matching Lavender bushes which are made in exactly the same way but trimmed flat on one side.


The flowers are made using "Flower Soft" - 'Crocus' for the Lavender, 'Sweat Pea' for the two big pots and 'Spring' for the two smaller pots. I also used some Reindeer Moss in the pots sitting on the bench inside.

I hope you like it?  More importantly, I especially hope my Sister likes it!!  I'm actually quite missing seeing it on my windowsill where its been the last week or so.  But there are other things rapidly taking up the space which I will share over the weekend... :)

Thanks for visiting, please check out my other pages.

Alli xx


Sunday 15 May 2016

Brownstone Church / Chapel with Bell Tower

How excited was I to receive my brand new just-released Die from the Tim Holtz 'Village' range yesterday - 'Brownstone'?! I straight away set about creating my first little house and as with the Village Dwelling, the first one had to be the Chapel / Church with Bell Tower.

I chose to paint this one in one of my favourite chalky finish paints - 'Vintage' by DecoArt.  Its fast-drying and gives a lovely matt finish. I used Vintage Photo distress ink on the walls just to make them look a bit more lived-in.  For the roof I used a Sizzix Texture Fades 'Notebook' embossing folder to give the appearance of wood panelling. I gave it a coat of silver grey paint and covered it with Glitter.  


I did the same for the Bell Tower roof.  The little bell was added before the roof was glued on.


The doors and windows were left white but again I used 'Vintage Photo' distress inks to tone them down and age them a little. I glue frosted acetate behind the windows and doors just to soften the look, especially if using an LED tealight inside.  


I hope you like this one?  I love the simplicity of this design by Tim, its a joy to make and I think leaving this one quite plain has worked well. I'm already on my second Brownstone, this one won't include the Bell Tower but will be more detailed.  I'll post that soon. :)

Thanks for visiting.
Alli xx

Thursday 12 May 2016

Little Glitter Houses

So as you can probably see from my header image, I'm really into making these at the moment. These are made using the basic Village Dwelling die from Tim Holtz / Sizzix. The dies cut out the basic house shape from whatever material you want to use. How you build and decorate them is entirely up to you.  This is my particular take on them, but no house will ever come out the same twice.


Making the houses is the easy bit I've found this week. Taking a decent picture of them is a whole other nightmare. I'm sure it'll get easier...hopefully! I haven't thought of names for any of them yet, but as I'm hoping to sell a few on Etsy at some point I'll get to this later. I'd love to hear your suggestions...


I don't know why but this one looks like a Derek or a Norman to me. Don't you think he looks like a little man with a bow tie and a matching pork-pie hat..? Just me then...! :)


The four large trees in the background were bought online, but as I said in my previous blog, I have found a method of making them myself which means I can make as many as I like in any size and colour I want.  All the small trees attached to the house bases are ones I've made.  


The two tiny ones on this blue house were some of my first, but as you can see from the other houses, I'm getting better at them. :)  I love making them they're so much fun, and when you add some glue and glitter they make perfect little Christmas Trees.


I've added hinges to all of my houses to give access to the Battery LED Tealight inside, and a magnetic closure so you can pick them up by the roof without the base falling open. 


Alli xx

Wednesday 11 May 2016

Church / Chapel with Bell Tower

Just a few weeks ago I discovered a range of dies by Tim Holtz / Sizzix - Village Dwelling. Fascinated as I am with making small things, the appeal of making these little houses was irresistible.  As soon as I received my dies I set about making my first little house. I made a little Church first, complete with Bell Tower and tiny brass Bell! :)


The lower part (the house) is made using the Sizzix Bigz XL die called "Village Dwelling".  It cuts the basic shapes for the house, roof, porch, base etc.  The "Bell Tower" die is a separate item, so if you don't want to make a church, you can just get the Dwelling die and make little houses.  I've made quite a few already, which you can see from my header image. I'll post more on these over the next few days.

I have found that recycled cardboard packaging is excellent for making these (..and its free!). Once painted and dried becomes they are pretty sturdy. For colouring I use a mixture of household matt emulsion, chalk paint or acrylic, and I colour the roof, windows and doors with Distress Inks and/or paint. I used an embossing folder to make the pattern of tiles on the roof.


I decided it needed to have a built-in tea-light holder (battery LED tealights only!!) and I wanted it to stay sitting neatly on its base where I intended it to sit, so I created a hinge on the back.

And so that it can be picked up by its roof without and remain attached to its base, I added a magnetic closure with just enough strength to hold it.


I hope you like the finished result?  I'll post some of my little houses shortly. Oh, and if you're wondering about the bottle-brush trees, the bigger ones were ones I bought online and bleached  and coloured myself. But I now make my own so that I can make them to any size and colour needed for the houses.  You'll see more examples of them as go along.  I'll share how I made them another time...

Alli xx


Card Making

A couple of years ago I discovered the Create and Craft channel on TV. I had never realised that there were so many people out there who love making things as much as I do. I quickly learned a lot of techniques for paper crafting that I'd never heard of and found craft products I never knew existed.


Before I found paper craft I used to do a lot of pencil drawings, but it was too detailed and slow-going. (I'll add a blog on these another time). I had wanted to do something more colourful and more interesting, so Card Making was ideal. I bought a Sizzix Big Shot die cutting machine and tentatively started making cards for friends and family.


As I got more confident and started adding different backgrounds and embellishments and I started stamping and colouring images. I've made some right howlers (sorry to those who've received them! lol), but some I'm relatively happy with and I've ditched a few techniques in favour of others as I've gone on.


I now find I keep coming back to my favourite designers and products - Tim Holtz / SizzixBarbara Gray / Clarity StampHobby ArtInky DoodlesLawn Fawn to name just a few. 

I. also ventured in to Digital Card Making through Serif Craft Artist and Daisytrail which if you're short on space for storing lots of craft products is ideal. I quite like to use it alongside traditional paper crafting, it gives you greater flexibility especially if you're making lots of the same designs of a card.

I started to make my own envelopes and developed a home-made measuring board that I use in conjunction with the Memory Keepers Envelope Punch Board to make envelopes exactly the size to fit my cards (since my cards almost never come out a standard size, let alone the same size twice!).  


And now I make my own gift bags to match my envelopes. I'll do a separate blog about envelopes and bags another time, because there's a lot I want to share on this.

Alli xx


Tuesday 10 May 2016

Needle Felting

This is something I'd wanted to try for ages, and I managed to convince my lovely Mum to get me a kit for Christmas. I wanted to have a try at making Christmas Angels, I'd seen people make them on You Tube and it looked easy enough(!). So these were my first attempts at Needle Felting...


It isn't difficult really, but it is painful, at least in the beginning!  My fingers took the brunt of the needle for the first few attempts, but gradually you learn to keep them out of the way (most of the time)!  Even so, by boxing day my fingers were throbbing!

It was worth it though as the angels turned out ok, but I found they were a bit delicate and wouldn't stand up to much handling. In fact they wouldn't stand up at all (on account of having no legs!).  I decided instead to have a go at making figures that would stand up on their own.  The basic principle is the same as the angels, but it involves a lot more stabbing (and injuries! lol) and a little more felt to get a firm base that's flat enough to stand unaided.  But the end result is something I'm much happier with.


I tend towards making things on the smaller side, so they came out at just under 4 inches for the adults and 2 1/2 inches for the child. I'll post more of these as and when I make them.


And then I went all-out, got a bit cocky and decided I needed a Clanger in my life. If you're asking yourself what a Clanger is and you've never heard of the Soup Dragon, then all is not lost because they're bringing them back to tv... http://www.bbc.co.uk/mediacentre/mediapacks/clangers/characters   Although they'll never be quite the same, obviously... ;)


I made my own version of Tiny Clanger. She was a bit of a labour of love, as I just had some one-dimensional images off the internet to go by, but I'm happy with the result.  I have to say that because she's watching me type this blog...


I also have to say, I'll never needle felt another Clanger in my life!!


Crochet Cacti

These are so much fun to make. There are so many lovely wools out there that you can use for instant texture, and adding some fluffy wool softens the look and gives them a realistic feel.  They're great for using up odds and ends too, you don't have to buy expensive wool for these. I found the little pots in my local Hobbycraft some time ago, I'm not sure if they still do them now. They're about 2 inches high and 2 1/4 in diameter. I'm sure you can get them elsewhere online.

They make great little gifts and stocking-fillers and look really nice as a group on a windowsill. But the best thing about these little guys, is that they never need watering and you can't kill them...well not easily anyway! :)


Thank you for visiting, please check out my other crafty pages...
Alli xx


Monday 9 May 2016

Crochet Bears / Amigurumi

If you go down to the woods today..hopefully you won't run into a real bear! You tend not to get many of those round here thankfully. Anyhoo..meet Olympia. You may recognise her from my profile picture. Where better to start?


Olympia was born during the 2012 London Olympics during my 'Crochet' phase.  I'd recently taught myself to crochet from You Tube and various websites and books and quickly discovered the weird and wonderful world of "Amigurumi".  So began a short obsession with crocheting small things. Miniature Teddy Bears quickly became a favourite, from teeny tiny ones...


...to buttoned and flowery ones...


..to pink girly ones...


And I even made a little mini mouse as a gift for my boss...


He lives in a little box on her desk where he keeps a secret stash of his favorite cheese...


Thank you for visiting, please check out my other crafty pages...
Alli xx